Building Centralized AWS Networking with Transit Gateway
Managing networking across multiple AWS accounts can quickly become complex and expensive. In this post, I’ll walk you through building a centralized networking architecture using AWS Transit Gateway that provides scalable connectivity, centralized egress, and simplified management across your entire AWS organization.
Solution Architecture
This architecture implements a centralized networking hub in a dedicated AWS account to manage ingress and egress traffic for multiple spoke VPCs/accounts. It leverages AWS Transit Gateway (TGW) for scalable inter-VPC connectivity and centralized routing.
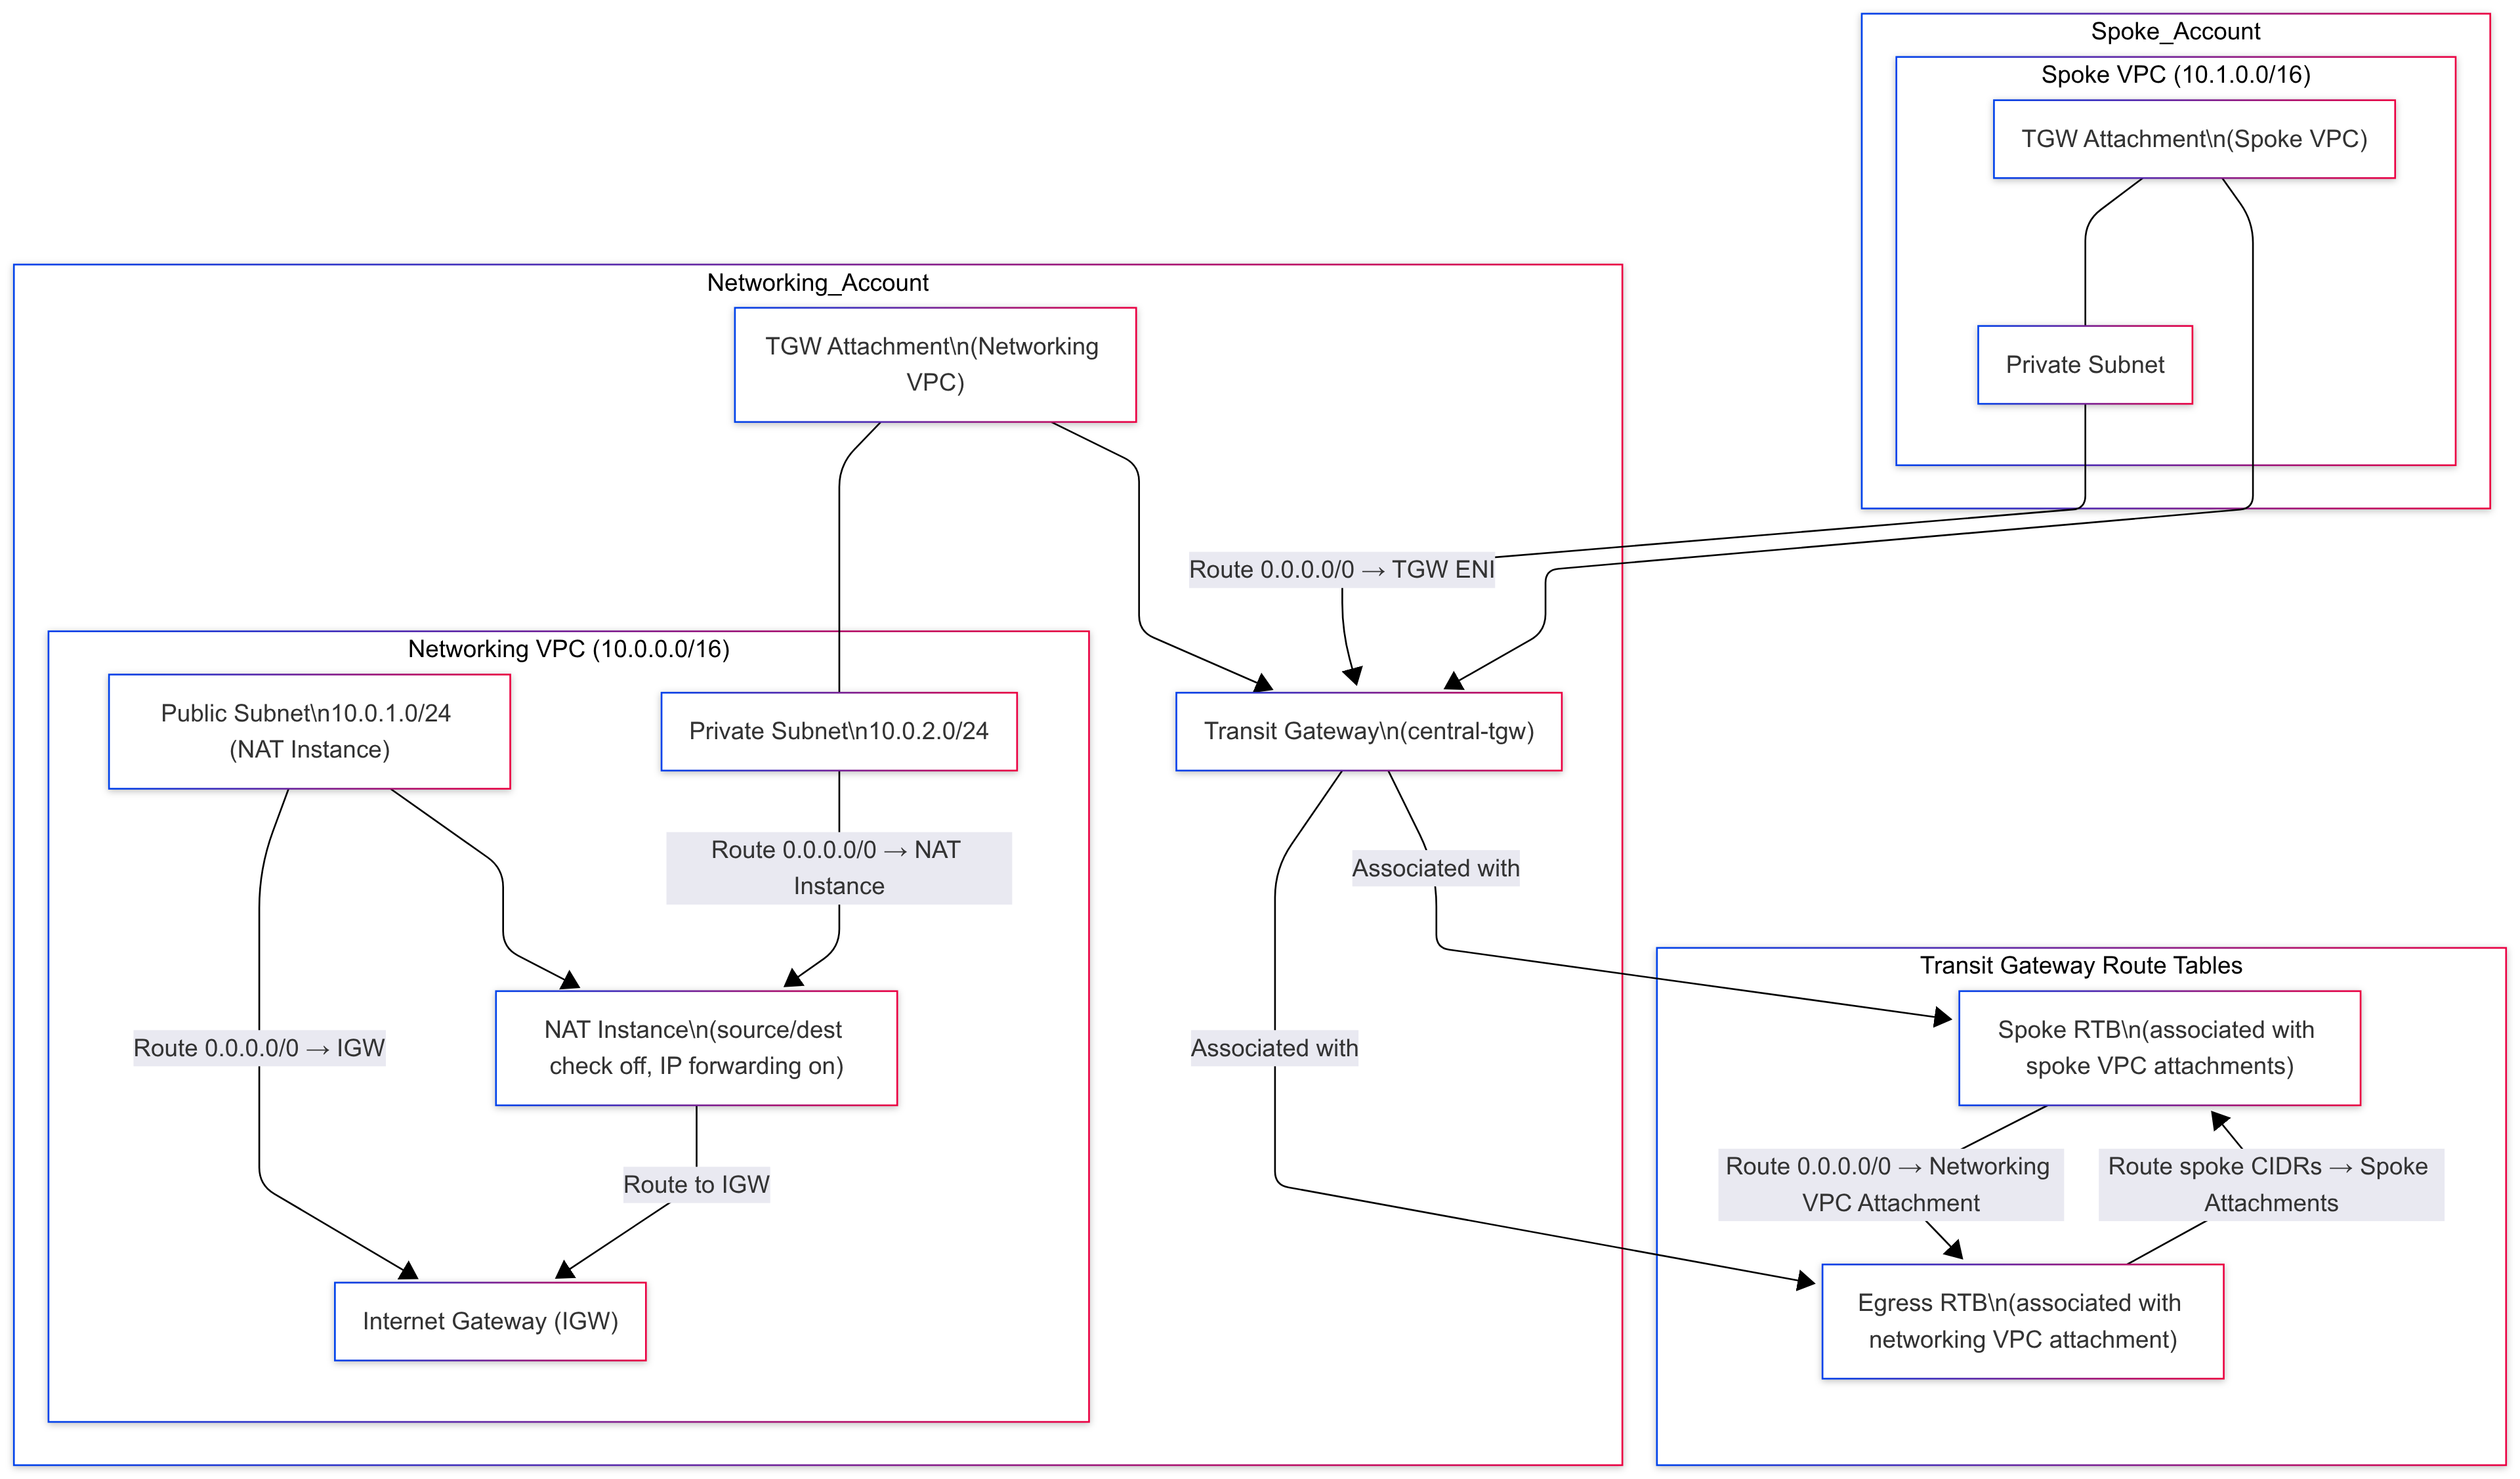 Figure 1: Centralized networking architecture with Transit Gateway hub-and-spoke model
Core Components
| Component | Purpose | Description |
|---|---|---|
| Networking VPC | Centralized VPC hosting IGW and NAT Instance | VPC 10.0.0.0/16 with public subnet for NAT instance to enable internet egress |
| Internet Gateway (IGW) | Internet access for networking VPC | Attached to networking VPC for outbound traffic |
| Transit Gateway (TGW) | Central router for spoke and networking VPCs | Central hub for all VPC attachments and routing |
| TGW Attachments | VPC attachments to TGW | Networking VPC and spoke VPCs attached to TGW |
| TGW Route Tables | Manage routing between VPCs | Separate RTBs for egress (networking VPC) and spokes |
| Public Subnet Route Table | Routes subnet traffic to IGW | 0.0.0.0/0 route pointing to IGW |
| NAT Instance | Provide outbound internet access for private subnets | Placed in public subnet, with source/destination check disabled, IP forwarding and masquerade enabled |
Implementation Guide
Step 1: Creating the Networking VPC Infrastructure
Establish the centralized networking VPC that will handle all internet egress:
- Create the networking VPC with CIDR block
10.0.0.0/16 - Create a public subnet (e.g.,
10.0.1.0/24) for the NAT instance to provide internet access - Create and attach an Internet Gateway (IGW) to the networking VPC
- Configure route table for the public subnet to route
0.0.0.0/0traffic to the IGW - Launch NAT instance in the public subnet with:
- Source/destination check disabled
- IP forwarding and masquerading enabled (OS config and iptables)
- Create private subnets for other networking VPC resources
- Configure private subnet route tables to route
0.0.0.0/0to NAT instance ENI (not IGW directly)
Step 2: Deploying Transit Gateway
Create the Transit Gateway that will serve as the central routing hub:
- Create Transit Gateway with custom Amazon ASN (e.g., 64512)
- Disable default route table association and propagation to maintain full control over routing
- Add appropriate tags for resource identification and management
Important: Disabling default route tables ensures you have complete control over traffic routing patterns.
Step 3: Configuring VPC Route Tables
Update networking VPC route tables to handle spoke and internet traffic correctly:
Private subnet route table:
- Route
0.0.0.0/0→ NAT instance ENI (for internet egress) - Route spoke CIDRs → TGW attachment ENI
Public subnet route table:
- Route
0.0.0.0/0→ IGW (for NAT instance internet access)
Step 4: Attaching and Configuring the Networking VPC
Connect the networking VPC to Transit Gateway and configure routing:
- Create TGW VPC attachment for the networking VPC using private subnets (NAT instance subnet is public and should not be attached to TGW)
- Associate the networking VPC attachment with the Egress Route Table
- Enable route propagation from the networking VPC attachment to the Egress Route Table
- Verify networking VPC private subnet route tables to:
- Route spoke VPC CIDRs (10.1.0.0/16, etc.) to TGW attachment ENI
- Route
0.0.0.0/0to the NAT instance ENI for internet access
Step 5: Creating Transit Gateway Route Tables
Create separate route tables for different traffic patterns:
- Create Egress Route Table - Associated with the networking VPC attachment, routes traffic destined for the internet via the NAT instance subnets
- Create Spoke Route Table - Associated with all spoke VPC attachments, routes default traffic to networking VPC attachment
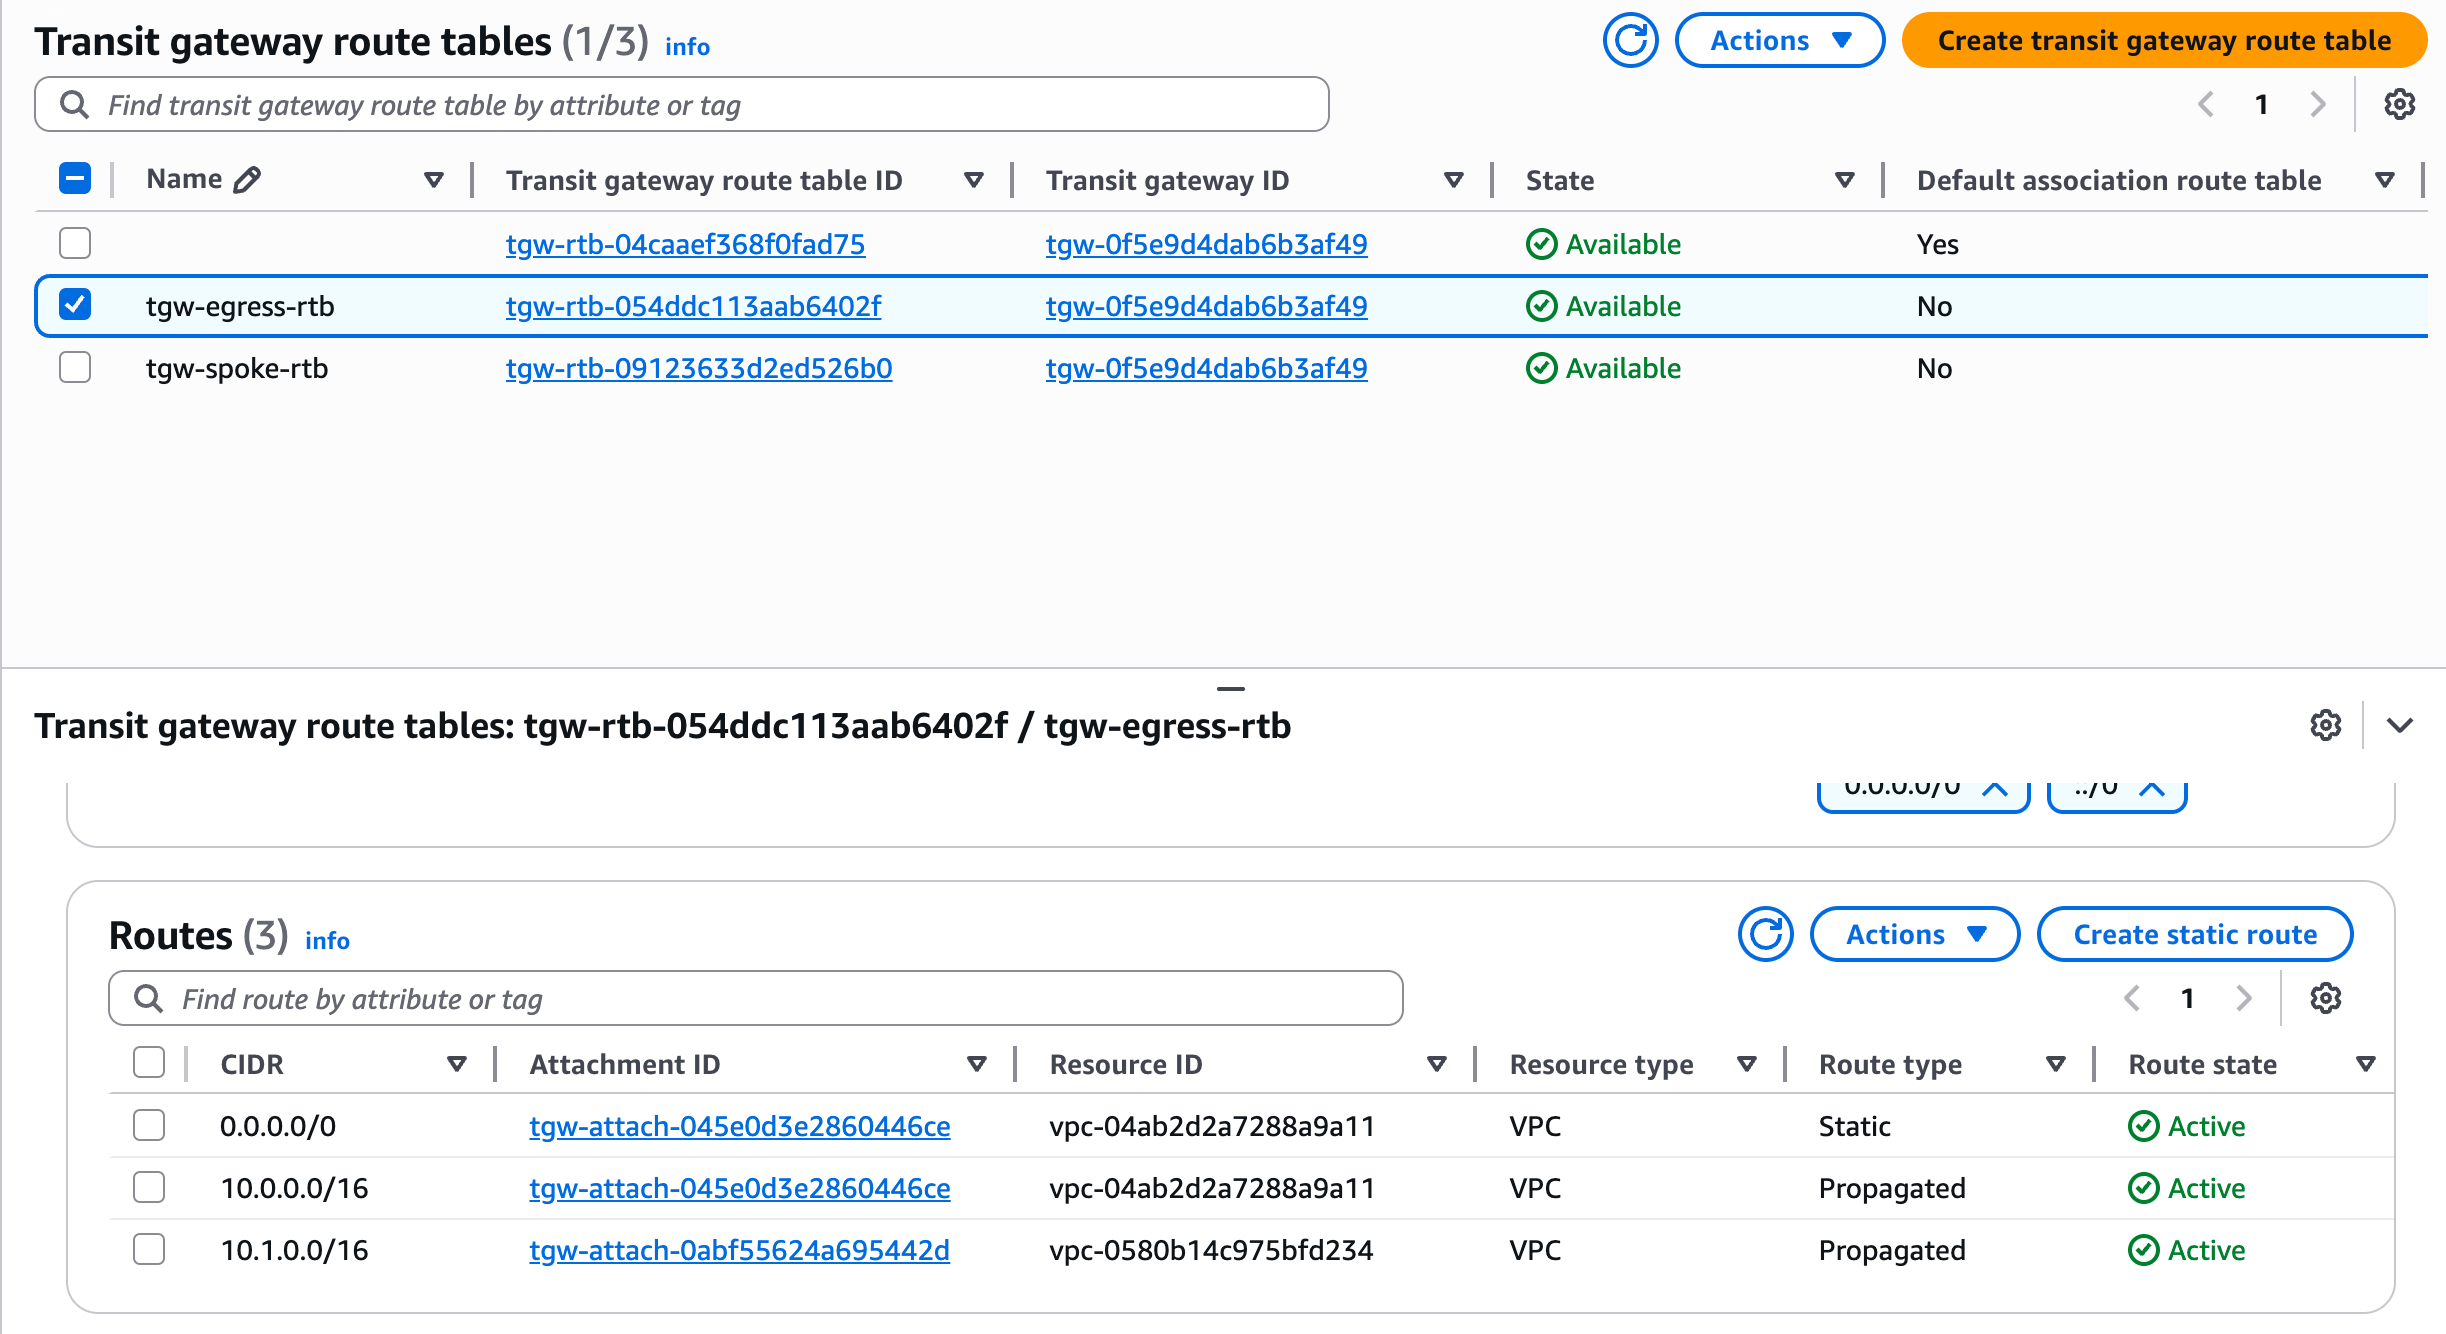
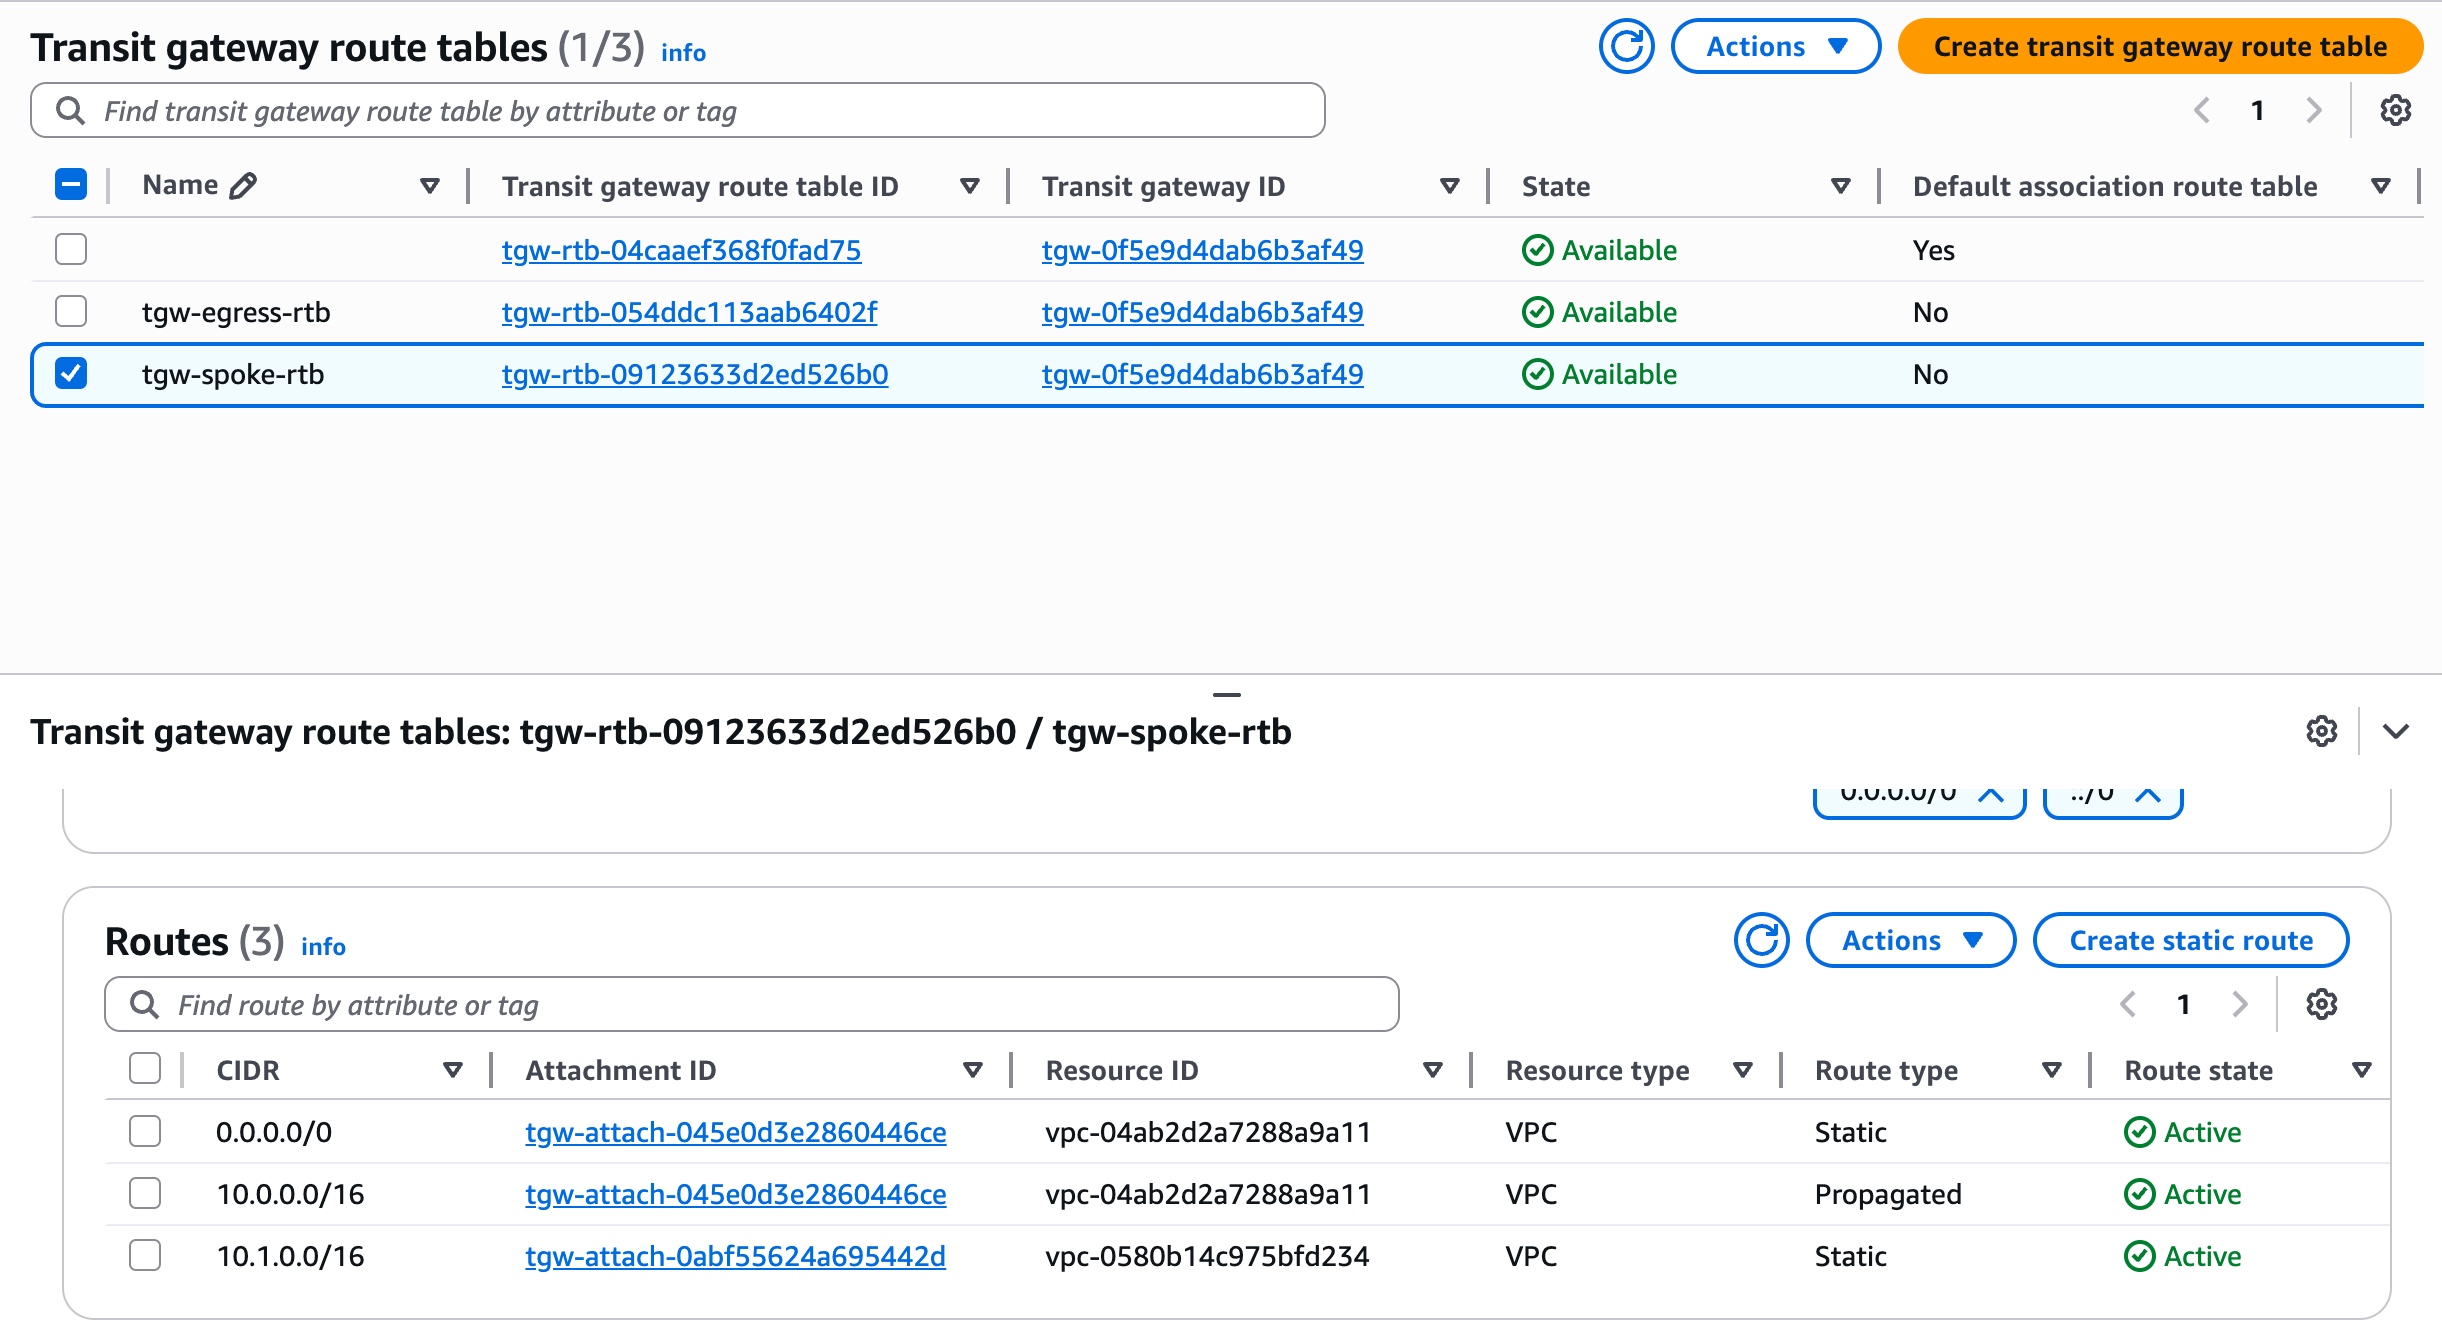 Figure 2: Transit Gateway route table configuration showing egress and spoke separation
NOTE: For Spoke Route Table since we don’t know spoke account can update later.
Step 5: Share Transit Gateway with Resource Access Manager
Enable cross-account access to the Transit Gateway using AWS Resource Access Manager:
- Navigate to AWS Resource Access Manager in the networking account console
- Create a new resource share:
- Name:
TGW-Central-Share(or descriptive name) - Select the Transit Gateway created in Step 2
- Add target accounts by Account ID or Organization Unit
- Name:
- Configure sharing permissions:
- Allow external principals if sharing outside your AWS Organization
- Add appropriate tags for resource management
- Send invitations to target spoke accounts
- Verify resource share status shows as “Active” once accepted
In spoke accounts:
- Navigate to Resource Access Manager → Shared with me
- Accept the resource share invitation for the Transit Gateway
- Verify the shared TGW appears in EC2 → Transit Gateways (with “Shared” status)
Note: Only share Transit Gateway with trusted accounts as they will have attachment capabilities.
Onboarding Spoke Accounts
Add spoke accounts/VPCs to the centralized networking:
Step 1: Create Spoke VPC
In the spoke account, create the VPC infrastructure:
- Create spoke VPC with non-overlapping CIDR (e.g.,
10.1.0.0/16) - Create private subnets across AZs (no IGW needed)
Step 2: Cross-Account TGW Attachment
Create a cross-account attachment to the centralized Transit Gateway:
- Accept the resource share in the spoke account
- Create TGW VPC attachment from the spoke account to the central TGW
- Select private subnets for the attachment
Step 3: Configure Spoke Routing (Networking Account)
In the networking account:
- Associate spoke attachment with the Spoke Route Table
- Enable route propagation from spoke attachment to Egress Route Table (for return traffic)
- Add default route (
0.0.0.0/0) in Spoke Route Table pointing to networking VPC attachment (the TGW attachment for central VPC) - Verify route propagation is working correctly
Step 4: Update Spoke VPC Route Tables
Configure spoke VPC route tables:
- Create route tables for spoke private subnets
- Add default route (
0.0.0.0/0) pointing to Transit Gateway - Associate route tables with private subnets
- Test connectivity from spoke resources (e.g., ping 8.8.8.8)
Traffic Flow Summary
Spoke → Internet:
Spoke VPC private subnet routes 0.0.0.0/0 to TGW → TGW Spoke RTB routes 0.0.0.0/0 to Networking VPC attachment → Networking VPC private subnet routes 0.0.0.0/0 to NAT instance → NAT instance in public subnet routes to IGW → Internet
Internet → Spoke (Return Traffic):
Internet → IGW → NAT instance (central VPC) → Networking VPC private subnet → TGW Egress RTB → Spoke attachment → Spoke VPC private subnet
 Figure 3: Detailed traffic flow showing egress and return paths
Troubleshooting Tips
- NAT instance must reside in public subnet with IGW route, do not attach this subnet to TGW
- Disable source/destination check on NAT instance and enable IP forwarding & masquerading
- Ensure proper security group and NACL rules on NAT, TGW attachments, and spoke instances
- Central VPC private route tables must have return routes to spoke CIDRs via TGW attachment
- TGW Route Tables must be properly associated and have correct static/propagated routes
- Use Reachability Analyzer carefully for cross-account TGW setups (enable cross-account analysis)
Automation and Infrastructure as Code
CloudFormation Implementation
For automated deployment, use Infrastructure as Code:
CloudFormation Template For Spoke Accounts: https://raw.githubusercontent.com/sawwn23/stuff/refs/heads/main/aws/bootstrap-networking.yaml
Ready to centralize your AWS networking? Start with a single spoke account and expand from there!